
Nina Petchprapa
Technical Environment Artist
Procedural Cave Walls in Houdini

Synopsis
-
This project was created in order to speed up the environment modeling pipeline in our game. The designers would give us the specification of the wall pieces that they needed in level building. After passing this off to the designers to start constructing levels, we soon realized that this was a good method to quickly realize the overall look of the game. But with the organic nature of the wall pieces, there were way too many seams needed to be covered. And that was impossible to do without having the repeating seam-cover-columns be unnoticeable. In the end we moved on to another method to finalize the geometry of the level. However, these walls are still used to block out levels.
-
Software: Houdini (modeling)
-
This system is capable of creating cave wall pieces at any given length, which can be exported as a high resolution model (for baking) and a game-ready, UV-unwrapped, low resolution model.
-
The look of the walls can be customized according to the need. However, the current set up is specifically done to follow the concept art.
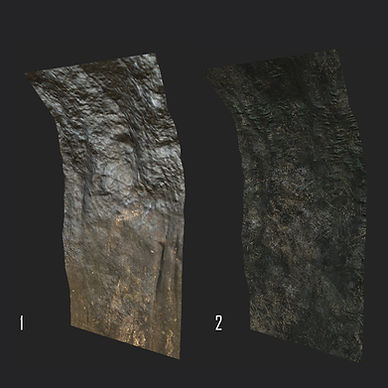
Final geometries from this generator
Finished Nodes

All the packages from the outside

Inside Wall_Width node

Inside Wall_Height node

Inside each of the Wall# node
1) Planning
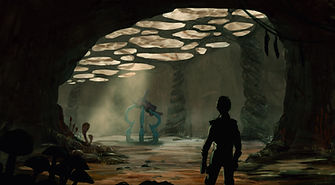
1.1) Different concept art pieces were created by artists on the team
1.2) A specific direction was provided by the art director to create wall pieces
- Rocky cave wall with vertical streaks
- Less noise in the lower area due to higher traffic
- Curve in at the top
- Dimension of each segment (meter)
- 10x20, 10x40, 20x20, 20x40, 40x20, a transition piece


By: Gird Thanthorn
By: Alberto Panico
By: Alberto Panico
1) Create the Height
2.1) Draw a curved vertical Curve using the Curve tool with 20 m height. Set the Primitive Type to NURBS, and Method to CVs to achieve a smooth line.
2.2) Use a Transform node to position the curve in the correct direction.
2.3) Add an Output node that is used as a shortcut pointing to the relevant property of the graph.

3) Control Noise Influence
According to the given art direction , we want more noise toward the ceiling, and less as it gets near the floor. Use an Attribute Wrangle node to control the influence of noises that will be added.
Create a float attribute called height = Relative Bounding Box whose argument as point position. The value at the bottom is 0, and 1 at the top. The value we use here is .5 which will allow the noise to start happing about half way up the wall. Then, to allow some undulation, we offset the height by 0.01.
This video is where I learned about this VEX expression. https://youtu.be/NAOnbopPU0I

4) Create the Width
4.1) Create a 10 m Line, with Primitive Type as a NURBS.
4.2) Add an Output node that is used as a shortcut pointing to the relevant property of the graph.

5) Plane Between Two Curves
5.1) Create a geometry node in the Scene Level.
5.2) Use Object Merge to bring in the wall width and height by selecting their Output nodes.
5.3) Use Sweep to create a plane between the two curves.
5.4) Convert the NURBS to Polygon


6) UV Unwrap
6.1) Add a UV Texture node to UV unwrap the mesh.
6.2) Use UV Quick Shade to preview the UV with a checker board pattern. Adjust the UV in the UV Viewport if needed.

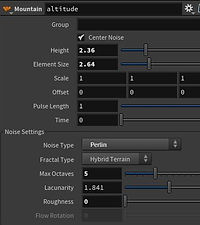
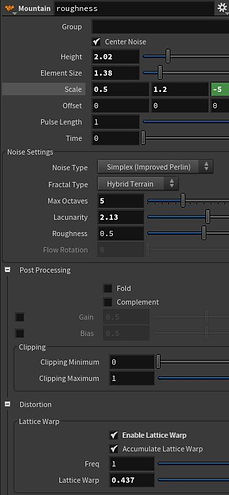
7) Add noises
7.1) Subdivide the mesh so we have enough polygon for the mesh to deform with the noise.
7.2) Add Mountain nodes and adjust the noise to get the preferred look. Below are my properties to achieve the final look
7.3) I also added a Smooth node to smooth out undesired sharp faces.

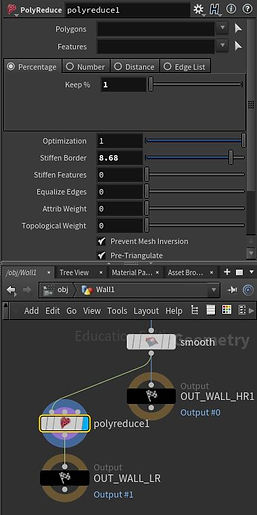
8) Lower Polygon Count
8.1) For a wall segment to be usable in game, we need to reduce their poly count. Add a Poly Reduce node and adjust the percentage of poly count you would like to keep.
8.2) Check whether the unwrap and poly count looks good by baking the normal detail of high poly model onto the low poly model and put on some textures.
8.3) Don't forget to also add an output node at the end of lowpoly and high poly procedure.

9.1) Create more curves of different height or width
9.2) Switch out the original height and width curves in the Object Merge Nodes with the new curves to create wall segments of different sizes.
9) Different Sizes Segments
